Bread Starter
Baked Goods, Breads
Ingredients
Bread flour
Water
large bowl
Tea towels
Measuring cups
Clear container with lid
Description
Takes 5-8 days initially.
Kept fed, it can last presumably forever. I cultivated the starter used for this recipe in 2015, and am still using it.
This recipe creates 2 cups of usable starter and 1 cup you keep and feed. My recipes are written with this in mind and will need to be scaled down if you plan to keep half as much. There are variations in recipes, but in general 1 cup of starter will give you a 4x9 loaf and 2 cups will give you a 4x13 loaf.
There are a few recipes that only require 1 cup of usable starter and you can toss the other cup, use it in another of the recipes that uses 1 cup, or feed it an equal amount of flour and water and have 2 cups to use the next day. I titled all the recipes using 1 cup as using starter/discard. There are also a few recipes, titled "with the option of starter/discard" that can have 1 cup of starter added as a way to use it up, even though the recipes don't need it.
You will note that there are some recipes that call for the addition of some dry yeast, usually sweet doughs. That is because sweet doughs tend to rise very slowly without the boost.
Directions
Day 0:
Fill a container or jar with water. Let sit covered with something permeable like cheesecloth or a tea towel over the top, at room temperature for at least a day before starting this process or feeding the starter in the future. This allows time for chlorine to evaporate away and ensures your water will be room temperature. I keep a jar on the counter all the time. If you are concerned about more than chlorine in your water, you should also filter it. Be sure to refill your jar or container when you finish with it.
Day 1:
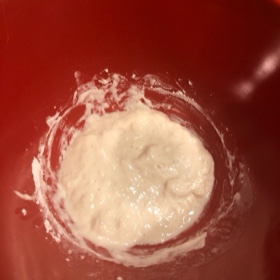
In your bowl mix 1/4 cup bread flour and a little over 1/4 cup water. Cover with a tea towel and let sit one day at room temperature. Don’t worry if your starter forms a skin between feedings. (Photos after feeding.)
Day 2&3:
Stir in 1/4 cup bread flour and 1/4 cup water, cover, and let sit for a day.
If on day 2 or 3 you discover that your starter has produced alcohol, discard 1/4 cup of starter. Feed it 1/4 cup of flour and 1/4 cup of water in the morning, then again in the evening. 
Day 4:
Stir in 1/4 cup of bread flour and 1/4 cup of water in the morning and again in the evening. Cover and let sit overnight. 
Day 5:
Measure out 1 cup and throw away extra.
To this starter, add 2 cups bread flour and not quite 2 cups water. Stir thoroughly and put in a marked container that will make it easy to see progress, and cover.
You want it to be very active and doubled. How long this takes can depend on the temperature, the humidity, and how strong your yeast is. If, at the end of the day it hasn’t doubled, continue to day 6. If it doubles, it is ready to use.
Day 6+:
Repeat the process from day five until it is robust enough to double.
Storage:
Set aside 1 cup and discard or use the rest.
Feed the cup you set aside with 2 cups bread flour and a little less than 2 cups water. Put it in a jar big enough to accommodate doubling and cover. Store in the refrigerator for up tp a week.
Using:
Let the starter warm up and become bubbly before dividing. You can let it sit out up to 12 hours before it will need to be divided and fed. Take out 1 cup of starter, feed it 2 cups of bread flour, and not quite 2 cups of water. Mix throughly, put in a clean jar, and return to the refrigerator. Use the remaining starter in your recipe.
Even if you don’t plan to make bread, it needs to be pulled out and fed around once a week to keep the yeast alive. Just discard what you aren’t using.
Making extra:
After you've taken out and fed your normal 1 cup and returned it to the fridge, divide the rest in half, into two bowls.
Feed each bowl with an equal amount of bread or whole wheat flour and water, cover with plastic wrap, and let sit several hours to overnight (depending on how active your starter is).
You now have enough for two recipes. If you want to make the recipes on different days, stick one of the starters in the refrigerator and only leave one out. When you are ready to use the one in the fridge, just pull it out to warm up.
Cutting in half:
If you want to make 4x9 loaves instead of 4x13 loaves, keep only 1/2 cup of starter. Feed it 1 cup of flour and not quite 1 cup of water. Adjust the recipes to use only 1 cup of starter. The ones that already only call for 1 cup may need to be adjusted down to 1/2 cup.
Saving dying starter:
If your starter has become too sour for your taste or is nearly flat you can save it. Follow the directions for day 1 of new starter and stir in 1/4 cup of your old starter. Discard the rest and continue following the starter making directions.
Starter producing alcohol:
Alcohol is produced as yeast die. It is normal to occasionally have some alcohol floating on your starter. But if it produces more than an inch before a week has gone by, you need to give it more food. Dump out the alcohol and discard 1 cup of your starter. Feed the remaining starter 1 cup bread flour and just enough water to be able to stir it in. Return it to the fridge for the rest of the week.
This can happen for a variety of reasons and it's not usually something to be worried about. If you notice it happening with increasing frequency though, you can try to solve it. First, after you feed your starter, try putting it in a new location in the refrigerator; it could be getting too cold. You can also try a new brand of flour or filtered water (if you aren't already filtering it.) If nothing else seems to work, use the procedure for saving dying starter.

Long term storage or travel:
You can just throw your starter away and start fresh when you are ready, but if you've been cultivating the same starter for years, you may feel a bit attached. Also, wild yeast from different areas isn't identical, so if you are happy with the results you get with yours, you may want to ensure you keep it.
European immigrants brought dried starter with them to San Francisco and it's still being used over 100 years later to make sourdough there.
Measure out 1/2 cup of your starter and feed it an equal amount of flour and water. Let it sit a couple hours to become bubbly and active. Discard the rest or make something with it.
Line a baking sheet with parchment or a silicon mat. Spread the starter out with a spatula, fairly thin. Let it sit until it is completely dry and starts to flake.
Crumble it up and put it in a small jar. Seal, and store in a cool, dark place.
When you are ready to revive and use it, put the yeast in a bowl and add just enough water to cover. Let sit until dissolved, stirring every so often.
Once completely dissolved, follow the directions for day 1 of making new starter and stir this in.
Notes
*If your kitchen is cold, you may want to move your starter to a warmer area. Just make sure it isn’t too hot or the yeast will die. If you have a proofing box or oven with a proof setting, use that.
*Bread dough made with wild yeast starter is very resilient in comparison to dough made with dry yeast. You can leave it sitting longer at almost any point, and put it in the refrigerator for even more time.
*Various sources say you can actually keep starter in the refrigerator up to a month, without feeding it, before it will die. Then discard all but a little and revive it. I have not tested this because I am not willing to chance losing it.
*A packet of dry yeast contains 2 1/4 teaspoons and does, approximately, the work of 1 cup of starter.
*Technically speaking, all starter is sourdough starter. But when people think of sourdough, they think of a specific sour, chewy loaf. They don’t think about all the other loaf types.
So, for clarity, I prefer to use the term sourdough only when making that type of loaf. The rest of the time, I just say starter.
*Other flours besides bread flour can be used to make and maintain starter, but many are broken down more quickly by the yeast, necessitating feeding it more often.